

If you’ve searched for what challenge coins are made of, you’ve probably seen the usual list: gold, silver, copper, bronze, nickel. That answer is partially true and mostly misleading.
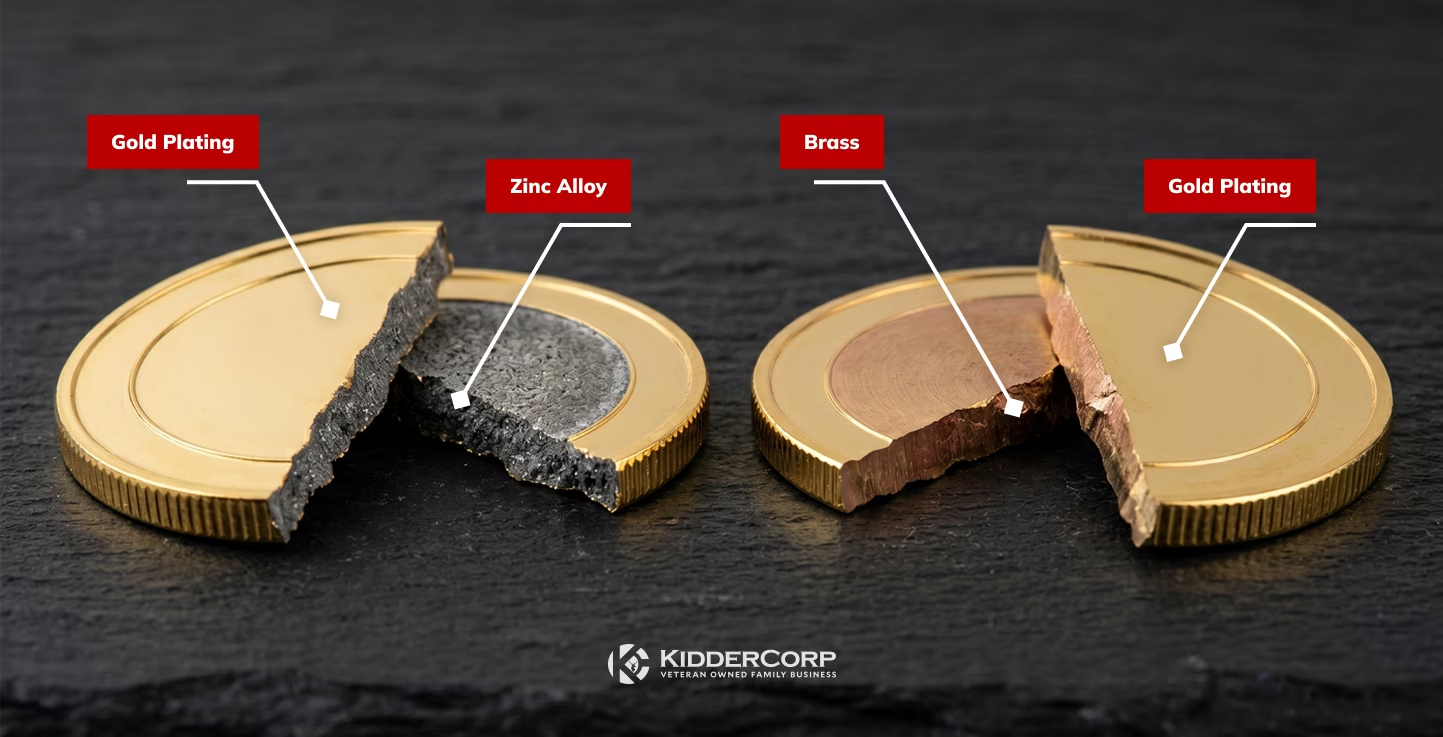
The honest version is simpler. The overwhelming majority of custom challenge coins are made from one of two base metals: zinc alloy or brass. Everything else you see in a coin description, the polished gold finish, the antique silver, the black nickel, the colored enamel, sits on top of one of those two metals.
This guide covers what’s actually inside a challenge coin, how the layers work together, and how to choose the right materials for what you’re trying to make. No sales pitch, no inflated claims about precious metals. Just what we’ve learned after twenty years of making them.
The Three Layers of a Challenge Coin
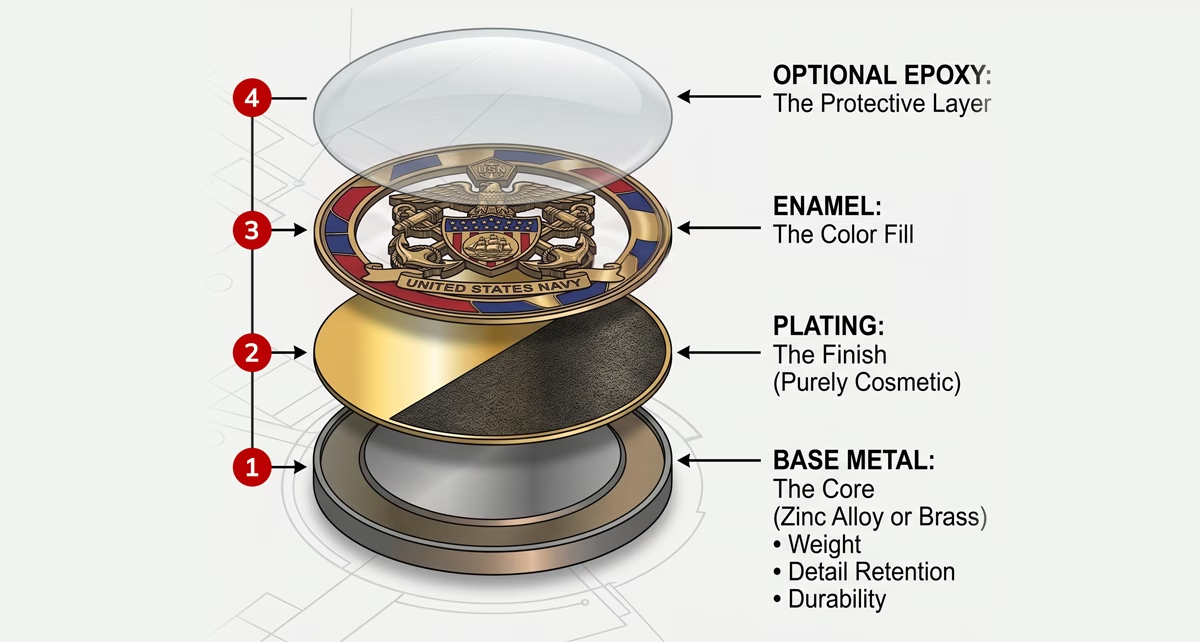
Before getting into specific materials, it helps to understand the structure. Every custom challenge coin is built in three layers, with an optional fourth.
- Base metal. The coin itself, the solid piece of metal that gives it weight and shape. The base metal determines how the coin feels in your hand, how it sounds when it hits a bar, and how much fine detail the design can hold.
- Plating. A thin metallic coating applied over the base metal. Plating is where the coin gets its color. A brass coin plated in gold looks gold. The same brass coin plated in black nickel looks black. The underlying metal is the same either way.
- Enamel. Color fill applied inside the recessed areas of the design, usually after plating. Enamel is what gives unit insignia their reds, blues, and yellows.
- Epoxy coating (optional). A clear protective resin applied over everything to protect the surface. We’ll cover that at the end.
Every coin you see is some combination of these layers. Once you understand the structure, the options make a lot more sense.
The Base Metal: What Your Coin Is Actually Made Of
This is where most articles get it wrong. They list gold, silver, copper, and nickel as base metal options, which suggests your coin is a solid piece of precious metal. It almost never is.
The real options come down to two materials.
Zinc Alloy
Zinc alloy is the most common base metal used in custom challenge coins today. It’s a lighter, softer metal that pours well into detailed molds, which makes it the preferred choice for coins with fine insignia, complex 3D sculpting, or unusual shapes. Zinc alloy also keeps production costs down, which is why it’s standard for larger orders where quantity matters more than weight.
Brass
Brass is the other common choice, and it’s our preferred base metal for most military and commander’s coins. Brass is denser, heavier, and feels more substantial in hand. When a brass coin hits a bar, everyone hears it. It holds up better under daily carry, resists corrosion well, and gives you the kind of heft that people associate with a quality piece. The tradeoff is that brass is slightly harder to work with for very intricate 3D designs, and it costs more per coin.
Less Common Base Metals
A few other metals show up from time to time, but they’re the exception rather than the rule.
- Iron. Used occasionally for specific finishes, but it’s brittle and harder to detail. Most manufacturers avoid it for coins that need to last.
- Pewter. More common decades ago. A soft tin-based alloy that holds detail well but dents easily, and it’s largely been replaced by zinc alloy for the same applications.
- Solid gold, silver, or other precious metals. These exist, but they’re almost exclusively for ceremonial or commemorative pieces with budgets to match. A solid silver coin for a flag officer’s retirement might make sense. A solid gold coin for a unit of 200 does not.
When you see a coin described as “gold” or “silver,” it’s almost always brass or zinc alloy underneath, with gold or silver plating on top. That’s not a problem. It’s just worth understanding what you’re actually getting.
Plating: Where the “Gold” Comes From

Once the base metal is cast and stamped into the coin shape, it gets plated. Plating is a thin layer of a different metal applied over the base, usually through an electroplating process, and this is where the coin gets its color.
Plating is purely cosmetic. It doesn’t change how heavy the coin is, how durable it is, or how well the design holds up. A brass coin plated in gold weighs the same as the same coin plated in black nickel. The underlying material is doing the structural work.
Here are the common plating options you’ll see on most challenge coins.
- Polished finishes. The bright, shiny versions. Polished gold, silver, copper, and nickel give a clean, dress-uniform look. Good for formal pieces, presentation coins, and anything meant to look sharp under lights.
- Antique finishes. A weathered, slightly darkened appearance that highlights the depth of the design. Antique gold, silver, copper, bronze, and nickel all add character and make three-dimensional details pop. Popular for unit coins, retirement coins, and anything meant to look like it has a story.
- Black nickel. A darker, more subdued finish that reads modern. Common for special operations units, cyber units, and coins where the design calls for a stealthier look. Often used on Navy and Marine Corps special warfare coins.
- Dual plating. Two different finishes on the same coin, used to create contrast between design elements. A gold-plated coin with silver accents, or a black nickel coin with antique copper highlights. Adds tooling cost but produces a premium result.
- Satin and matte. Softer, less reflective finishes. Less common but useful when you want the design to feel understated.
One thing worth knowing: plating quality and thickness vary by manufacturer. A cheaply plated coin starts to show wear within a few months, especially on the high points of the design where the finish rubs off. A properly plated coin keeps its finish for years of normal handling. This is one of those details that separates a coin that gets carried daily from one that ends up in a drawer after the gold starts wearing off.
Enamel: Where the Color Comes From
Plating gives the coin its metallic color. Enamel is what fills in everything else, the reds, blues, greens, and yellows in the unit insignia, the background colors, the design elements that aren’t metal.
Enamel is applied by hand. After the coin is stamped and plated, a technician fills the recessed areas of the design with colored paint, curing it so it hardens into place. Done well, the colors sit flush against the raised metal lines and look sharp for years. Done poorly, the paint bleeds, chips, or fades.
There are two main types of enamel, and the difference matters.
Soft Enamel
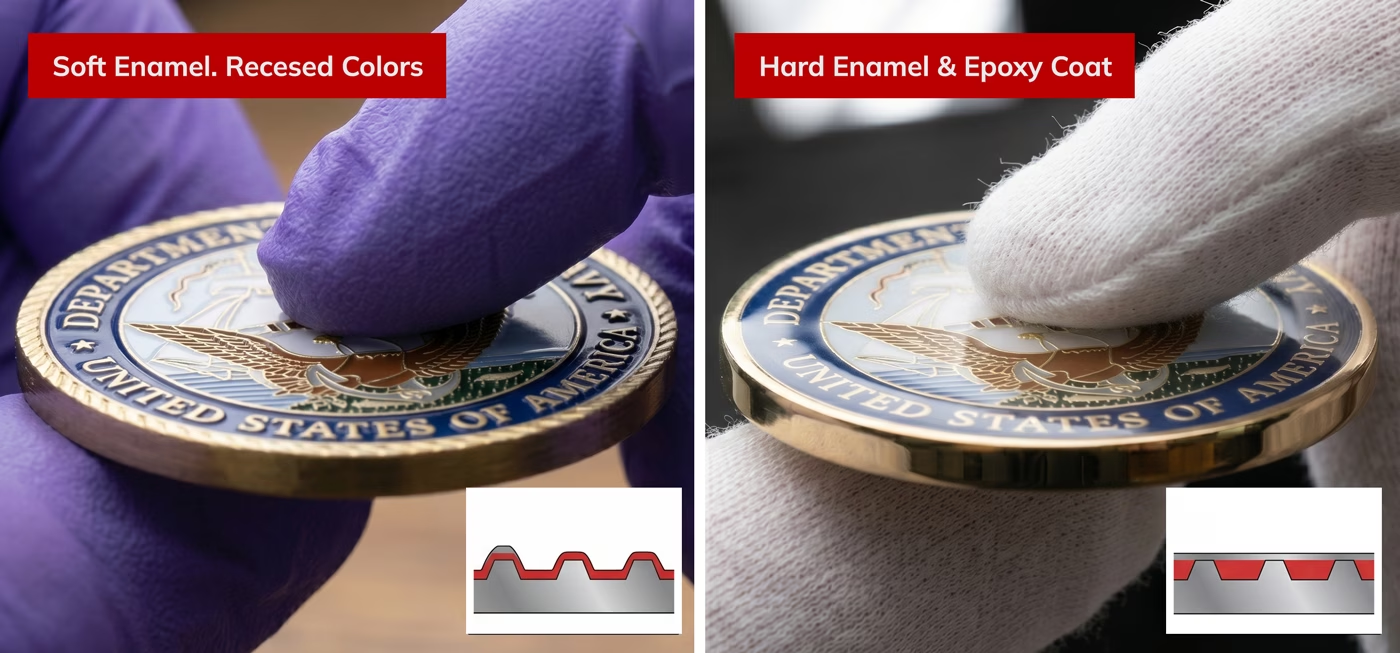
Soft enamel is the most common. After the paint is applied, it sits slightly below the level of the raised metal lines, giving the coin a textured surface that you can feel with your thumb. Soft enamel gives the design dimension and makes the metal lines stand out. About 90% of military coins use soft enamel.
Hard Enamel
Hard enamel is polished flat after curing, so the paint sits flush with the metal lines and the entire surface feels smooth, almost like jewelry. Hard enamel gives a cleaner, more refined look and holds up slightly better to wear, but it takes longer to produce and costs more.
Neither is objectively better. They serve different aesthetics. Soft enamel is better for rugged, traditional unit coins. Hard enamel is better for polished, formal pieces. If you want the full comparison with photos, we wrote a deeper breakdown here: Soft Enamel vs Hard Enamel Challenge Coins.
Color Matching
Most manufacturers work from standard color references to ensure accurate color, especially for unit insignia where the exact shade of blue or red matters. If your design has specific brand or organizational colors, provide the color codes with your artwork and the enamel gets mixed to match. Our color references covers the full reference set.
The Protective Layer: Epoxy Coating
After plating and enamel, some coins get one more treatment: a clear epoxy coating applied over the surface.
Epoxy is a clear protective resin, and it can be applied two ways. The more dramatic version is a full epoxy dome, where the coating is thick enough to create a rounded, glass-like bubble over the face of the coin. It’s what most people picture when they hear “epoxy coated.” The thinner version is a flat clear coat that seals the surface without changing the profile of the coin.
Both do the same job. They protect the enamel and plating from wear, scratches, salt air, and the general abuse of daily carry. The difference is aesthetic. A thick dome catches light and gives the coin a magnified, premium feel. A thin coat preserves the natural shape and texture of the design, which matters for 3D coins where you don’t want the sculpted details flattened under resin.
When to Use Epoxy
- Daily-carry coins. If the coin is going to live in someone’s pocket, take a beating, and see a coin check every few weeks, epoxy extends its life significantly.
- Coins for harsh environments. Navy and Coast Guard coins especially. Salt air degrades unprotected enamel faster than most people realize. Epoxy adds real protection.
- Soft enamel coins that need a smoother feel. Epoxy can give soft enamel coins some of the smooth, polished feel of hard enamel without the added production cost.
When to Skip It
- 3D coins with significant sculpted detail. A thick dome flattens the visual depth and undoes the point of sculpting the design in three dimensions.
- Display-only coins. If the coin is going into a shadow box and never getting handled, the protective value isn’t worth the cost.
- Coins where the edge texture or engraving is a major design element. Epoxy only covers the face, but it changes how the whole coin reads visually.
Ask your manufacturer up front whether the epoxy is a full dome or a thin protective coat. Both are legitimate choices, but they look and feel different, and the price difference is usually minimal.
How Do You Choose the Right Materials?
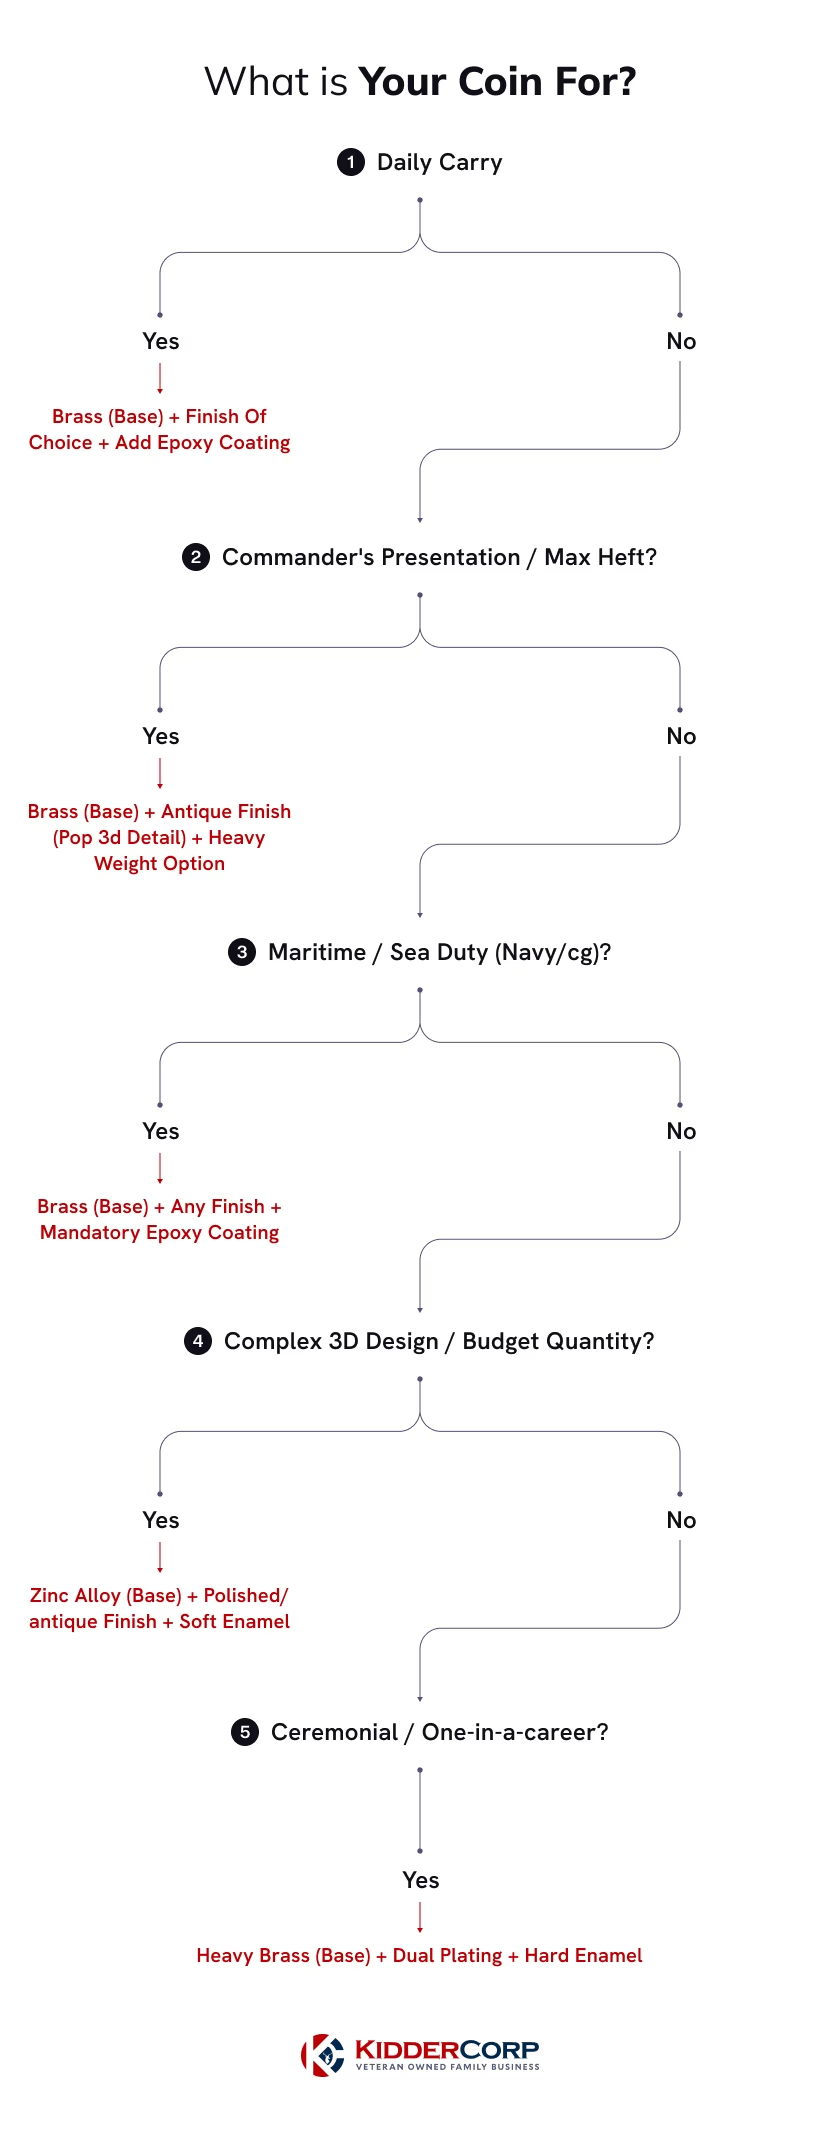
With all of these options, the question most people end up asking is simple: which combination is right for me? Here’s how we’d think about it, depending on what you’re actually making.
For daily-carry personal coins
Go with brass as the base metal, any finish you like, and add the epoxy coating for protection. Brass holds up to years of pocket wear better than zinc alloy, and the epoxy layer keeps the enamel and plating intact. This is the combination for coins that are meant to be carried, not displayed.
For large commander’s coins and presentation pieces
Brass is the right call here too. Presentation coins need weight. When you hand someone a commander’s coin, the heft tells them it matters before they even look at the design. Antique finishes work especially well for these because they give the coin visual depth and a sense of history. See our guide to challenge coin sizes for recommendations on scaling up for senior leadership coins.
For unit coins with intricate insignia or complex 3D elements
Zinc alloy is usually better. It holds fine detail more cleanly and handles 3D sculpting more reliably than brass. Pair it with whatever plating matches the unit’s aesthetic, and skip the thick epoxy dome if the 3D elements are central to the design.
For large bulk orders on a tight budget
Zinc alloy with polished plating and soft enamel is the most cost-effective combination that still looks good. You lose some of the weight and premium feel, but for coins going out to a large unit, class, or event, this is where the money is best spent. This combination is common for Army and Air Force bulk unit orders.
For Navy, Coast Guard, and any maritime application
Brass with epoxy coating. Salt air is brutal on unprotected coins, and the added protection pays off within a year or two of deployment. This is especially true for Chief’s mess coins that get carried through every sea duty rotation.
For ceremonial, memorial, or once-in-a-career pieces
This is where it makes sense to talk to your manufacturer about custom options: heavier brass, hand-finished plating, hard enamel, specialty plating like dual or rose gold. These coins don’t need to scale to a thousand units. Make them feel like what they’re meant to commemorate.
For display-only coins
Zinc alloy is fine, since the coin isn’t getting handled. 3D sculpting and a thin clear coat (not a dome) preserve the detail best under glass.
There’s no single right answer, and most manufacturers can walk you through the tradeoffs once they know how the coin will be used. The more specific you can be about the purpose, the better the recommendation you’ll get.
The Bottom Line
If there’s one thing to take away from all of this, it’s that the material stack matters more than any single layer.
Zinc alloy or brass for the base. Plating for the color. Enamel for the design. Optional epoxy for protection. Every coin you’ve ever held is some combination of those four layers, and the choices at each step add up to the piece you end up carrying.
Most of the confusion around challenge coin materials comes from articles that list metals without explaining how they actually go together. “Gold” usually means gold plating over brass, not solid gold. “Bronze” usually means antique bronze finish over zinc alloy. Once you understand the structure, the terminology makes a lot more sense.
If this is your first time designing a coin and you want more background on the tradition itself, our complete guide to challenge coins covers the history and culture in depth.
If you’re designing a coin and aren’t sure which combination fits what you’re trying to make, tell us what the coin is for. A retirement piece, a daily-carry unit coin, a deployment commemoration, a large bulk order for an event. Each of those calls for different choices, and we’re happy to walk you through the tradeoffs before you commit to a design.


